
Making homemade ice cream with your KitchenAid stand mixer is a game-changer for dessert lovers. By using the official ice cream attachment, you can churn professional-quality, creamy treats right in your own kitchen with minimal effort. Follow this guide to master the process, choose your favorite ingredients, and impress your friends with decadent, custom-made frozen desserts.
There is something truly magical about the taste of homemade ice cream. In 2026, as we embrace more hands-on culinary experiences, using a KitchenAid stand mixer to create frozen desserts has become a favorite hobby for home cooks. You might already own the iconic mixer for baking bread or whipping meringue, but adding the ice cream maker attachment opens up an entirely new world of flavor and texture.
Making ice cream with a KitchenAid stand mixer is surprisingly simple once you understand the mechanics. It turns your sturdy countertop workhorse into a high-performance churning machine. Whether you crave classic vanilla bean, rich dark chocolate, or experimental seasonal fruit medleys, having full control over your ingredients means you get the freshest dessert possible. Let’s dive into how you can turn your kitchen into a private creamery.
Key Takeaways
- Freeze the Bowl Properly: Your ice cream bowl attachment must be frozen for at least 24 hours to ensure it is cold enough to churn effectively.
- Chill Your Base: Always chill your custard or cream base in the refrigerator for at least two to four hours before pouring it into the mixer.
- Low Speed is Key: Use the “Stir” or lowest setting on your KitchenAid stand mixer to ensure a smooth, dense texture without incorporating too much air.
- Add Mix-ins Last: Wait until the final minute of churning before adding chunky ingredients like chocolate chips, nuts, or crushed cookies to avoid clogging the dasher.
- Hardening Time: Freshly churned ice cream has a “soft serve” consistency; transfer it to an airtight container and freeze for four hours for a scoopable texture.
- Clean Promptly: Hand-wash your frozen bowl once it returns to room temperature to protect the inner coolant mechanism.
Understanding the Equipment
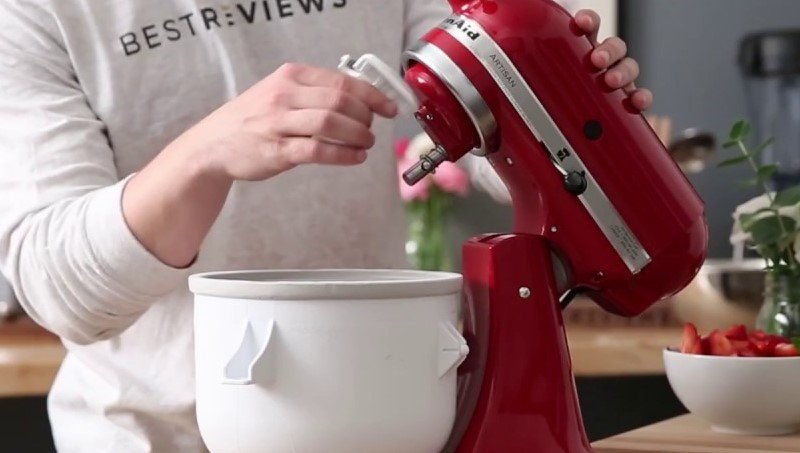
Before you start whisking eggs and cream, it is essential to understand the hardware. The KitchenAid ice cream attachment consists of three main parts: the freezer bowl, the dasher, and the drive assembly. The bowl contains a specialized liquid coolant that retains extreme cold, allowing the base to freeze while the dasher keeps the mixture moving.
Preparing the Freezer Bowl
The success of your ice cream depends entirely on the temperature of your bowl. You cannot simply pull it out of the freezer and expect it to work. It needs a full 24 hours in the back of your freezer. If you shake the bowl and hear liquid sloshing around inside, it isn’t cold enough. It should sound solid. Keep the temperature of your freezer at 0 degrees Fahrenheit or lower for the best results.
Setting Up the Mixer
Once the bowl is ready, assembly is quick. Place the drive assembly onto the mixer head, insert the dasher, and lock the freezer bowl into the base. It is vital to have the mixer running on its lowest speed before you pour in your base. If you pour the liquid in while the mixer is off, the mixture will freeze instantly to the sides, causing the dasher to jam and potentially damaging the gear mechanism.
Mastering the Ice Cream Base
The base is the heart of your ice cream. Most professional-grade recipes start with a custard base—a mixture of heavy cream, whole milk, sugar, and egg yolks. This creates a rich, velvety mouthfeel that commercial ice creams often lack. However, you can also opt for “Philadelphia-style” ice cream, which skips the eggs entirely for a lighter, more refreshing finish.

Visual guide about How to Make Ice Cream with Kitchenaid Stand Mixer
Image source: icecreamdiy.com
The Importance of Chilling
Never skip the chilling step. If you pour a warm or room-temperature base into your frozen bowl, the heat will melt the bowl’s coolant instantly. This leads to icy, grainy ice cream. Aim for your base to be around 40 degrees Fahrenheit before you start. You can achieve this by making your base the night before and leaving it in the fridge overnight. The colder your base starts, the faster it will churn and the smaller the ice crystals will be.
Flavor Infusions
This is where your creativity shines. If you want to use fresh ingredients like mint leaves, vanilla beans, or citrus zest, infuse them into your warm milk and cream base before chilling. Let the flavors steep for at least 30 minutes, then strain them out. This creates a depth of flavor that is impossible to replicate with artificial extracts.
The Churning Process
Churning is the process of simultaneously freezing and aerating your base. When you learn how to make ice cream with a KitchenAid stand mixer, you will notice that it does not incorporate as much air as commercial machines. This results in a denser, more satisfying scoop. Patience is your best friend during this phase.
Watching the Consistency
Most batches take between 15 and 20 minutes to reach the ideal soft-serve consistency. Keep an eye on the bowl. You are looking for a stage where the mixture clings to the dasher and thickens significantly, looking similar to soft-serve ice cream. Do not over-churn, or the fat in the cream might begin to separate, turning your dessert into butter.
Adding Mix-ins
If you want to add cookie dough bites, toasted nuts, or chocolate chunks, add them during the last minute of churning. This ensures they are evenly distributed without causing the dasher to get stuck. Avoid adding soft fruit like strawberries during the churn; instead, fold them in by hand after you transfer the ice cream to a container to keep the texture fresh.
Hardening and Storage
When you finish churning, your ice cream will have the texture of soft serve. While you can eat it immediately, most people prefer a firmer scoop. Transfer the mixture to an airtight, freezer-safe container. Press a piece of parchment paper or plastic wrap directly onto the surface of the ice cream to prevent ice crystals from forming on top.
The Final Freeze
Place the container in the coldest part of your freezer for at least four hours. If you used a natural, high-fat recipe, you might find it hardens quite a bit. Simply let it sit on your counter for 5 to 10 minutes before scooping. This softens the fats and makes for a perfect, easy scoop every single time.
Preventing Freezer Burn
Homemade ice cream lacks the stabilizers and preservatives found in store-bought tubs. This means it is at higher risk for freezer burn. To keep your creation tasting fresh for up to two weeks, keep it stored in the back of the freezer rather than the door, where temperature fluctuations are more frequent.
Common Troubleshooting Tips
Even with a perfect recipe, things can go wrong. If your ice cream is too icy, it is likely because the base was too warm or you churned it too slowly. If your mixture refuses to thicken, double-check your freezer temperature or the thickness of your base. Remember, high-fat ingredients like heavy cream provide the best structure, so avoid substituting with too much low-fat milk.
Why did the dasher stop spinning?
If the dasher stops during the churn, your base likely froze too quickly to the walls of the bowl. This happens if the base was too warm or you started the machine before the bowl was fully frozen. Turn off the mixer, scrape down the sides, and let it sit for a moment before trying again.
The Joy of Homemade Creations
Learning how to make ice cream with a KitchenAid stand mixer is a journey of endless possibilities. You are no longer limited to the flavors stocked at the grocery store. You can create dairy-free alternatives using coconut milk, experiment with savory flavors like basil or olive oil, or master the classic vanilla bean that tastes better than anything you can buy.
In 2026, as we all look for ways to be more intentional with our food, making ice cream from scratch feels like a small but meaningful victory. It is an activity that invites family participation and results in a delicious reward. So, clear some space in your freezer, grab your favorite ingredients, and start churning. Your homemade masterpiece is just a few minutes away.
Frequently Asked Questions
How long does the bowl need to be in the freezer?
The freezer bowl must be frozen for at least 24 hours before use. Ensure your freezer is set to 0 degrees Fahrenheit or lower for the best results.
Can I make vegan ice cream with this attachment?
Yes, you can easily make vegan ice cream using full-fat coconut milk or a high-quality oat cream base. The chilling process remains the same as it would for dairy-based recipes.
Why is my homemade ice cream grainy?
Grainy ice cream is usually caused by the base being too warm before churning or by melting the ice crystals during the freezing process. Always ensure your base is chilled to 40 degrees Fahrenheit before starting.
How do I clean the ice cream bowl?
Wait until the bowl reaches room temperature, then wash it with warm, soapy water by hand. Never place the freezer bowl in the dishwasher, as the heat can damage the coolant mechanism.
Can I add alcohol to my ice cream mixture?
You can add a small amount of alcohol, like bourbon or rum, but be careful. Because alcohol lowers the freezing point, adding too much will prevent the mixture from hardening properly.
How long can I store homemade ice cream?
Homemade ice cream is best consumed within one to two weeks. Since it lacks commercial preservatives, it is most delicious when enjoyed fresh.